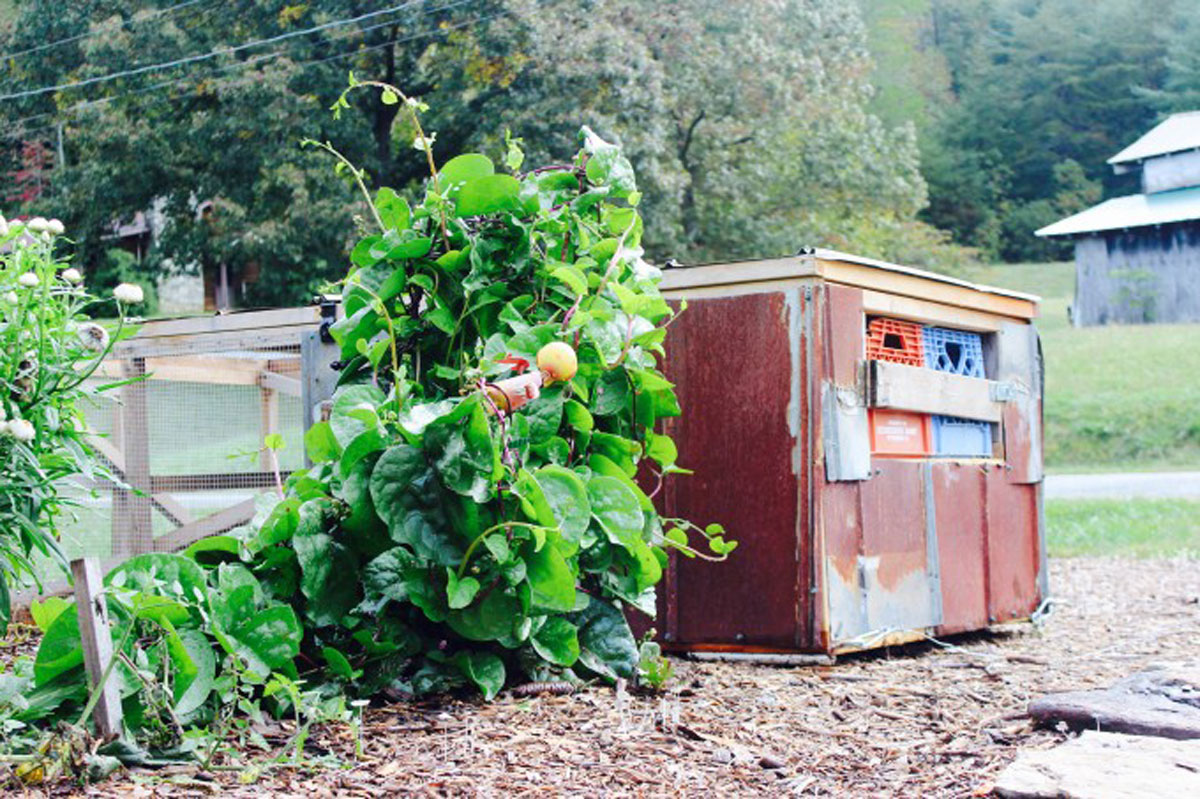
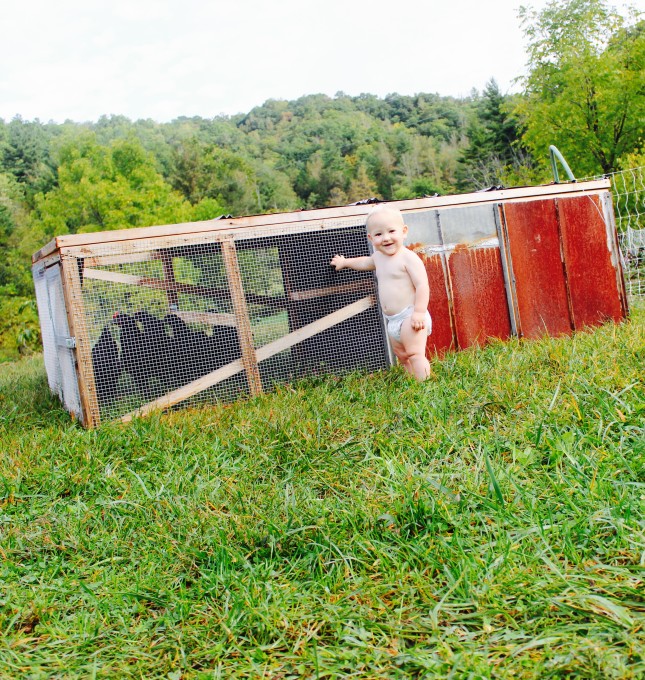
This chicken tractor is perfect for small flocks of twelve or less who need to move around on grass to eat or work to clean up in a small garden. It is one of 5 great chicken coop ideas that really work.
Read on to learn how to build a chicken tractor in just one day. This easy DIY plan will supply shelter and feed for your hens (or baby chicks), and easily move using PVC instead of a wheel.
Why is it Called a Chicken Tractor?
We automatically think of a tractor as something used for outdoor, agricultural purposes. Most often it is used in some manner to work the soil in fields and gardens, and is generally a powerful workhorse!
A chicken tractor serves the same purpose; the chickens work up the top inch or more of dirt with their pecking and scratching all while producing a natural fertilizer and enriching the soil. It’s a great way to raise chickens from a permaculture approach.
The chicken tractor is movable allowing for different areas of your yard and garden to be worked up as needed. By moving it daily and giving the chickens access to fresh food, it is possible to make the chicken tractor the main shelter for your flock.
How Much Does a Chicken Tractor Cost?
Although it looks easy, good design is very hard to come by. After ten years of working with chickens, I’ve come up with an easy and affordable chicken tractor plan that almost anyone can build.
I built this extremely functional, DIY chicken tractor for less than $200. Granted, I re-purposed the tin and the milk crates, and I had the screws. But come on people, I built this with expensive cedar 2X4’s!

The Best Features of this Chicken Tractor
- Multi-Functional – Automatically till, fertilize, harvest and/or build garden soil.
- Perfectly Sized – Sized perfectly (43”X8’) for small garden beds.egg
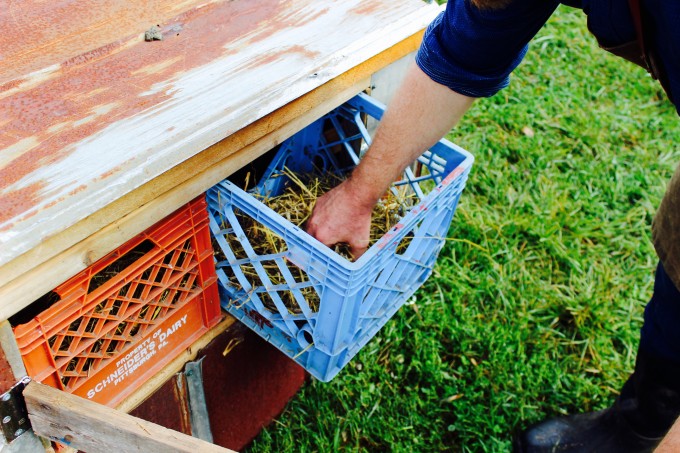
- Egg Collection – Easily manage egg laying hens with access to the egg boxes from outside the tractor.
- Nesting Boxes – My signature self-cleaning milk crate nesting box system.
- Permanent Housing – Use as a coop to free-range your birds (optional).
- Economically Built – Minimum height with a smart layout offers plenty of room and is easy on the budget.
- Landing Bar – Swiveling landing bar doubles as a nest block to prevent your chickens from roosting in the boxes and pooping in them.
Material List
- 10 Untreated 2x4x8 – I like cedar, as it’s naturally rot resistant, but you can use an eco-friendly, non-toxic coat of paint over some untreated lumber. There will be plenty of ventilation, so you won’t have to worry about it creating any respiratory problems.
- 1 Untreated 1x4x8
- 16” of Untreated 1×2
- 16’ of ½” Hardware Cloth, 24” wide
- 4 Sheets Ribbed Steel Roofing (classic tin roofing), 8’ long, or at least 25’ of Tin – I sourced mine from an old barn roof we replaced. Use the classic width of 2.16” wide.
- Two Dozen 6×1 ⅝” Deck Screws
- A Box of 8 x 3 Deck Screws
- 2 Milk Crates for the Nesting Boxes
- 8’ Electric Fence Wire (12 or 14 gauge) – Lowes sells wire/cable by the foot in the hardware section.
- 2’ of Old Water Hose – Will be used as a pulling handle over the wire.
- 2, 2¾” Spring Link – (hardware carabiners) for attaching the wire to the tractor.
- 3 Hasps – Used for the two doors and lid.
- A Box of ¾” Poultry Nails – Used for nailing in the hardware cloth.
- 5, 3½” Hinges – Used for the doors and lid.
- 4, 3-⅞” Screw Eye Hooks – Used for attaching the wire and pulling the tractor.
- 2’ of 1½” PVC Pipes for the Bottom Skids (optional) – These make moving the tractor a little easier, and they help to keep the wood off of the ground.
- Box of Roofing Screws
Required Tools
- Cordless Drill with Drill Bits – A 5/32 drill bit and a ⅜ drill bit for pilot holes for the screws and the screw eye hooks.
- Measuring Tape – You know you’ll need it!
- Pencil – Used to make your cutting marks.
- Hammer – You will need a hammer to knock in the poultry nails.
- PVC Saw (or a saw suitable for plastic) – Used for cutting the PVC and milk crates.
- Skill Saw – Needed to make your board cuts.
- Tin Snips – Used for cutting wire mesh, chicken wire, and tin.
- Socket Wrench or Heavy Duty Screwdriver – Needed to screw in the screw eye hooks.
Material Cut List
- Rip-cut all the 2×4’s – Defined as sawing your board parallel to the grain. The result will create 20 2x2s.
- Set aside 8 of these “2x2s” – To be used as they are.
- Cut One 2x2x8 into Two 40” Pieces and One 11” Piece – Scrap the 5” leftover piece.
- Cut One 2X2X8 into Two 40” Pieces and One 15” Piece – Scrap the 1” leftover.
- Cut Two of the 2x2x8s into 24” Pieces – It should make 8 pieces. You shouldn’t have any scrap left.
- Cut One 2x2x8 into a 47½” Piece and Two 24” Pieces – Scrap the remaining little bit.
- Cut One 2x2x8 into Two 40” Pieces, and One 15” Piece – Scrap the remainder.
- Cut Another 2x2x8 into Two, 40” Pieces and One 15” Piece – Scrap the rest.
- Cut One 2x2x8 into a 24” Piece, a 30” Piece, and a 40” Piece – Scrap the leftovers.
- Cut One 2x2x8 into a 26½” Piece, Two 23” Pieces, and Two 10” Pieces – Scrap the rest.
- Cut One 2x2x8 into Two 40” Pieces and One 15” Piece – Scrap the inch left over.
- Cut One 2x2x8 into Two 9¾” Pieces – Save the 76.5” leftover piece just in case you make a mistake and need it to replace something.
- Save the Remaining 2x2x8 – Keep to make up for mistakes, or to use on another project.
- Cut the 1×4 into Two 20” Pieces, a 23” Piece and a 26⅝” Piece – Scrap the leftovers.
- Cut Two 8” Pieces from a 1×2 Piece of Wood
- Cut Four 24” Pieces of the ½” Hardware Cloth
- Cut One Piece of the Hardware Cloth 21” x 26”
- Cut One Piece of the Hardware Cloth 22” x 18”
- Cut Another Piece of Hardware Cloth 24” x 43½”
- Cut Four 26” Pieces of Tin
- Cut Two 13” Pieces of Tin and Take One of those Pieces and Narrow it to 19” – Make sure you leave the rib. Now you have a 13” x 19” piece of tin.
- Cut Two 14½” Pieces of Tin then Narrow each of them to just 7½” Wide – Be sure to leave a rib in each piece.
- Cut Three 43½” Pieces of Tin
- Cut the 2’ Piece of PVC in Half to Make Two 1’ Pieces of PVC Piping
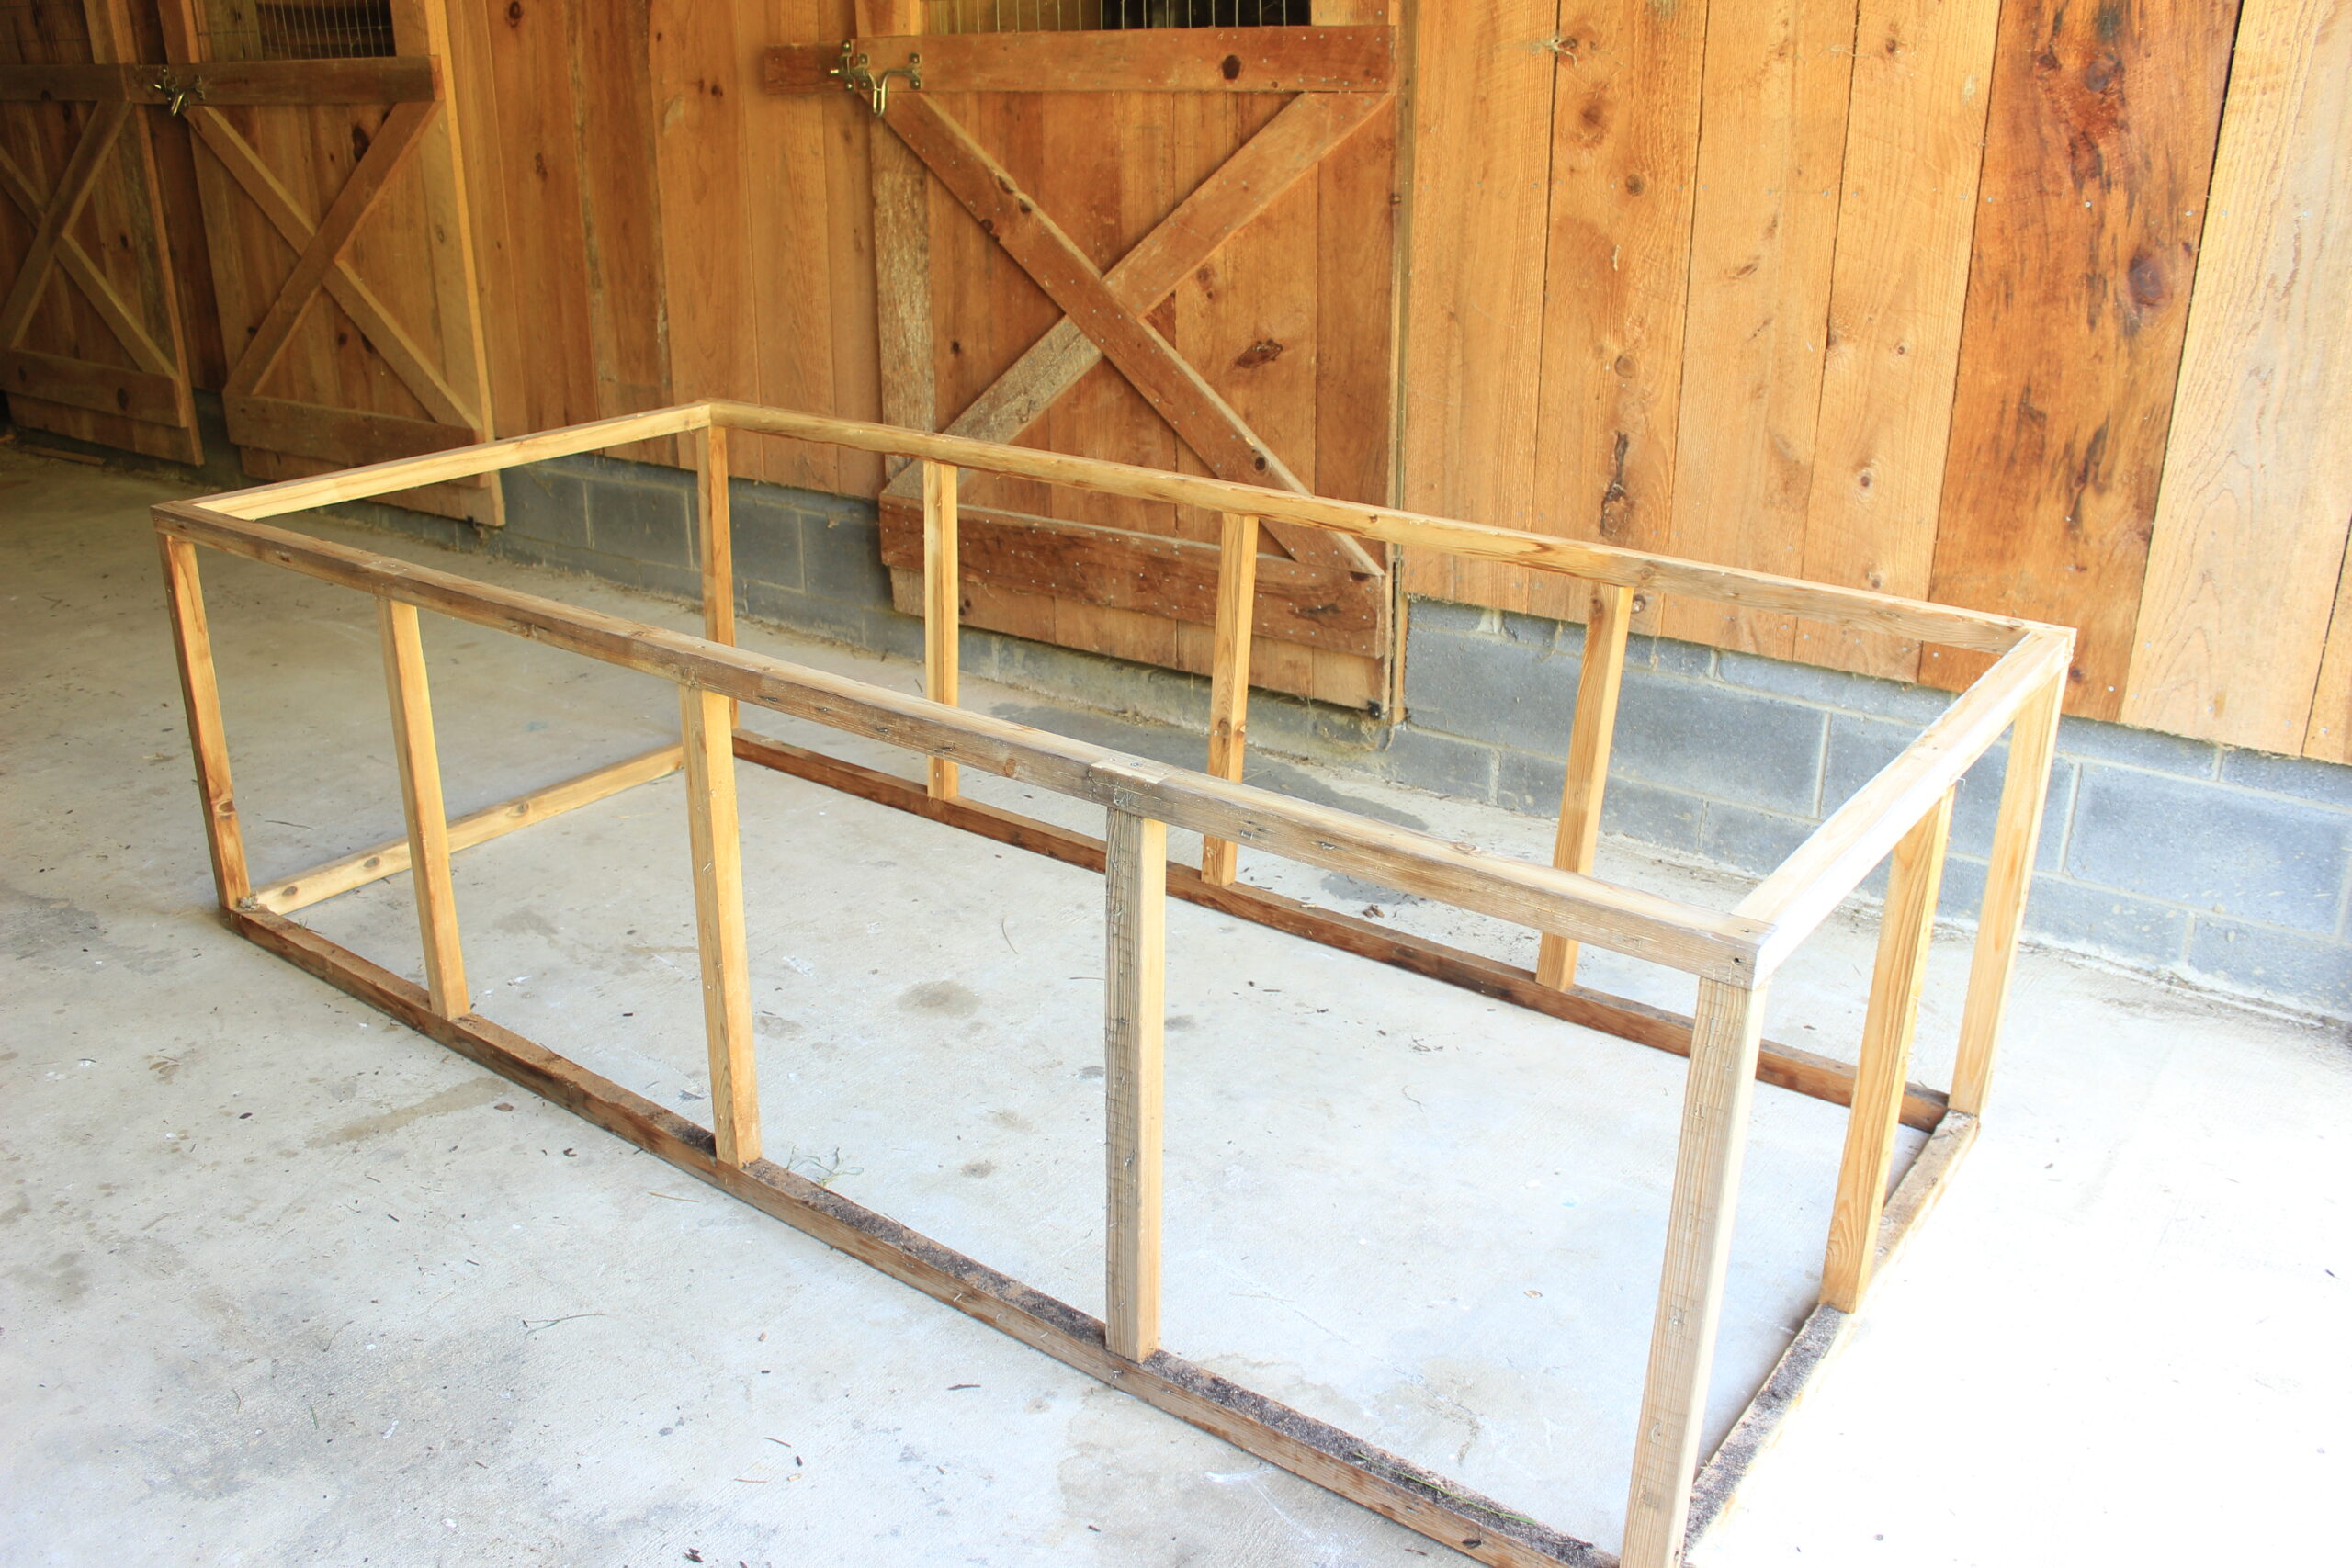
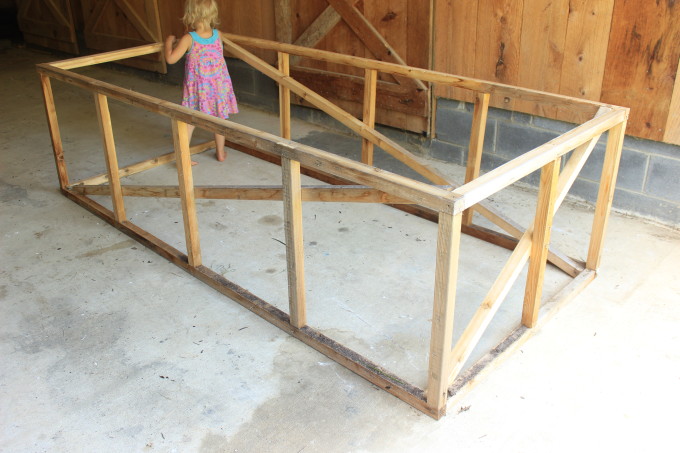
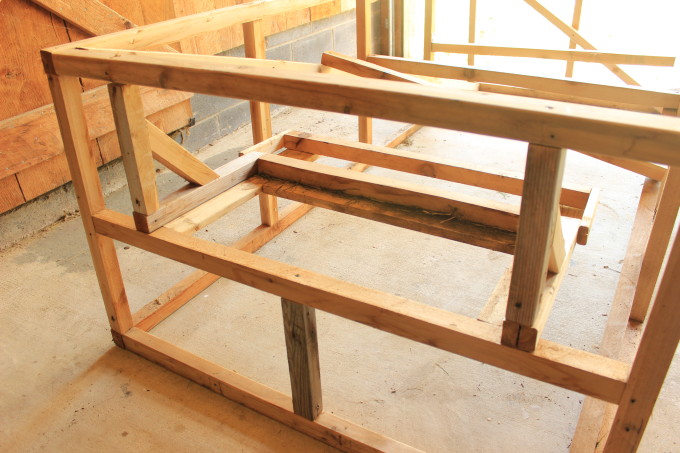
Building the Main Frame of Our Mobile Home
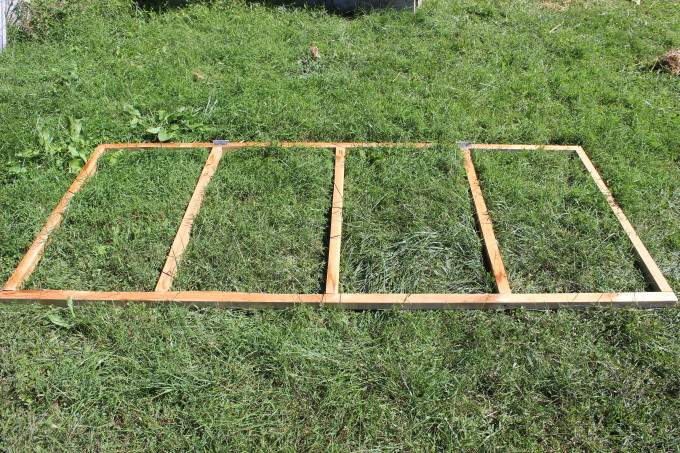
- Start by laying out two 8’ long pieces of 2×2 parallel with each other, about 40” apart.
- Screw in two of your 40” pieces on either end of your 8’ pieces. Make sure you’re placing the 40” pieces on the inside if you know what I mean. In other words, I don’t want your frame to be longer than 8’, so don’t mount your 40” crossbars to the outside of your 8’ pieces. Just take a really good look at one of the pictures below.
- Repeat steps one and two to make another rectangle frame.
- This next part takes a bit of finesse. Go around and screw in your four 24” posts. Essentially, you’re creating a table.
- Now, put in your side vertical posts every 24” from the very end. That’s 3 vertical posts on either side at 24” apart. Be sure to put your posts on the center of 24.”
- Notice there’s not a vertical post in the middle on the back wall. From now on, I’ll refer to the end furthest away in the picture as the back wall. That’s the wall that will eventually hold each nest box. Hang on, we’ll get to that in a minute. You should now have a ridiculously loose table looking frame. Good job!
- Now, let’s do the front/middle/vertical 2×2 post. Wow, that was descriptive! By the way, I’m referring to the front as the side facing the right in the picture below. The front will eventually have the door. This vertical post needs to be centered at 21½” from the outer edge of both sides.
- I’m sure there are several ways you could attach the bottom, but I recommend flipping this over and placing your other frame on top.
- Screw the other rectangle frame onto your posts. If you don’t have another rectangle frame, then you missed the part where I said make two of these things in step #1. No big deal! Just review step #1 to make another rectangle frame. Be sure to screw in at the same measurements as this will ensure your posts are actually straight up and down.
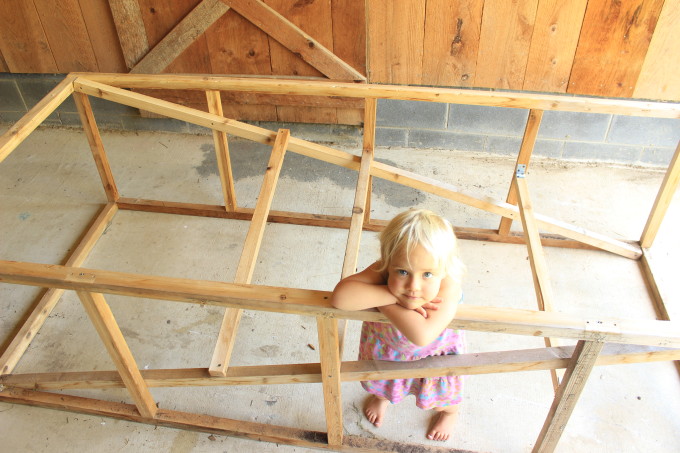
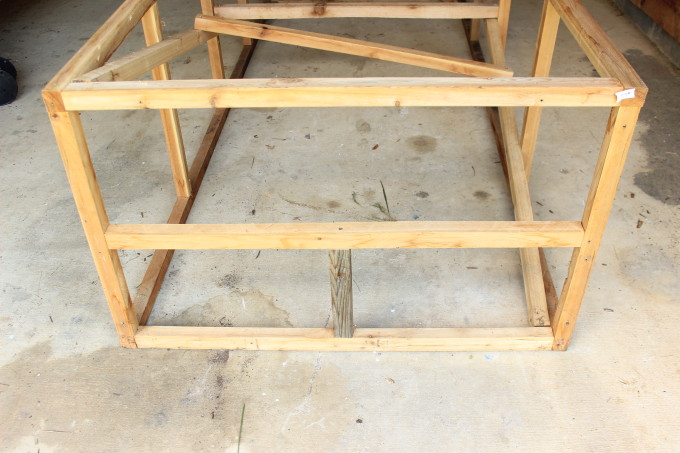
Adding Diagonal Bracing
- Take two of the 8’ 2×2’s and use them as diagonal bracing along both sides mounted on the inside of the frame. This next part is tricky to explain so bear with me! Make sure the braces don’t run in the same direction. Notice how the one furthest away slopes down to the right, and the closer one slopes down to the left? This is where we will mount three perches or a roosting bar.
- Take the 47½” 2×2 piece and use it as a diagonal brace across the front. Now, make sure you slope it up from left to right. It’s important to keep that right side open for the placement of the door later on.
Adding the Perches
- Let’s start with the middle perch because it’s the easiest. Grab a 40” 2×2 and place it across the middle. Notice how it rests on the middle of both cross braces. Screw it in.
- Now, let’s add the perch that’s on the right. It also needs a 40” 2×2. Be sure to mount it 12” from the bottom. You might notice that I’ve taken care to make sure the chickens have at least 12” above the perches, so they have room to sit on them and 12” below the perches, so they can roam underneath them.
Notes Regarding Perches
Look closely at the perch on the right, and notice I used an angle brace. I must have been day dreaming because you can totally drill through that vertical post into the perch. Do that and forget the angle brace.
You can’t tell from here, but you’ll notice the left perch is not level. In nature, chickens would perch on a branch. I know it’s not round, but my chickens don’t seem to mind the square perches. It makes for an economical solution, and if you’re really concerned, you could totally sub these out for round perches.
Ok, seriously, we’ll get back to building. It’s important that the perch on the left NOT go any further to the left because we’ll need to leave room for our future nesting box contraption. To know where to place this left perch, measure out one foot to the left of the middle post.
Installing the Back Framing
- For the back side, run a 40” 2×2 across the back, placing it 11” up from the top of the base frame. If I were you, I recommend taking one of the 11” 2×2’s and resting your cross piece on that. You won’t have to measure anything if you do this.
- Next, screw in an 11” 2×2 into the center at 21½” from either side.
Building the Nesting Box Base
- Let’s first build the 2×2 framing. Screw in two 15” 2X2’s onto the end of the 26½” 2×2. See the photo below.
- Now, let’s put our 1×4 bottoms onto this framing. I like to put these together by screwing in the 1×4’s on top of the framing, then flipping it over when it’s done. That way I can use smaller screws by screwing through the 1×4. Go ahead and loosely place your two 1x4x20” pieces on either side and your cross 1x4x23” cross board on the frame.
- Screw in the 1×4 sides by running them flush along the outside of the 2×2 side posts and have the 2×2’s sticking out 1¾” at the bottom.
- Next, place your 1×4 cross board in the middle running between your two side 1×4’s and screw into the 2×2 frame. Make sure you’re placing the 1×4 cross piece flush to the outer edge of the 2×2 cross piece. Now, flip this contraption over.
Pro-Tip: Take a break! My dad used to say, “We’ll break when it’s over”. Seriously, if you’re not having any fun, take a moment for some tea. Re-group and get back to it!
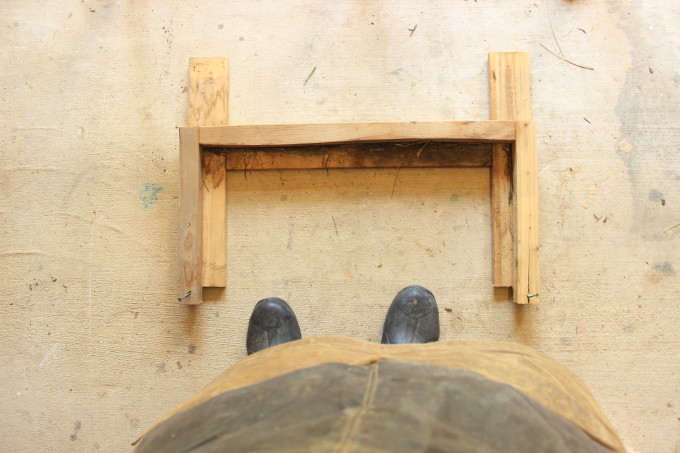
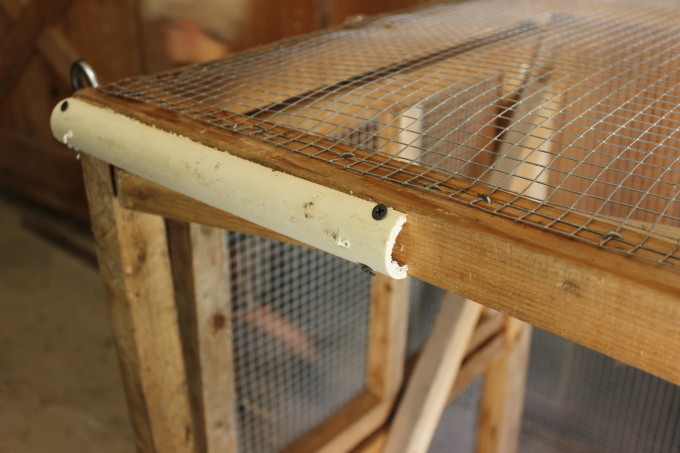
Constructing the Landing Bar
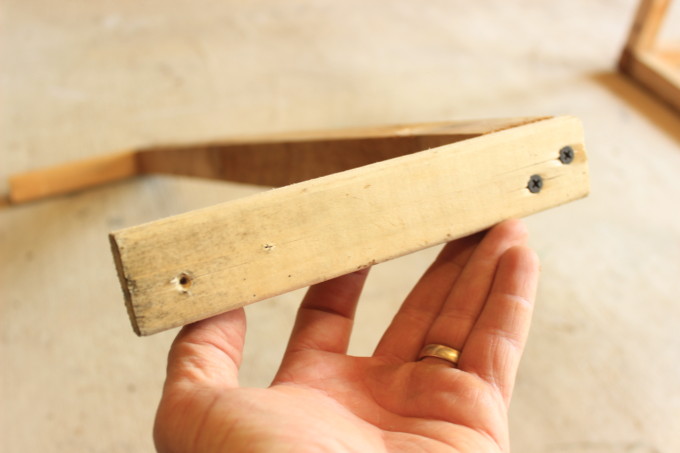
- Let’s begin putting together the swiveling landing bar by screwing in the two 1x2x8’s into the ends of the 30” 2×2. You now have the swivel bar. Notice how I put two screws in on either side. That keeps the 2×2 cross piece from twisting.
- Mount the swivel bar by setting it on the nesting box base. Screw only one screw into either side and make sure you don’t screw it in tight. You want it to be loose so that you can use these screws for axles to swivel on.
Mounting the Nesting Box Base
- Place your nesting box in the center. It’s okay to estimate the center at this point. Use a scrap piece of wood or a partner to hold up the other end of the nesting box base while you work on attaching it to the frame.
- To center this thing, measure 5” from the inside of the corner posts.
- Screw in two vertical 2x2x9¾” posts on top of the arms of the nesting box base.
- Take the two 10” pieces and cut 45 degree angles on both ends. Go ahead and screw in the 10” diagonal braces. This will go a long way for holding up the nesting box base.

Installing Hardware Cloth
- Hammer the four 24” pieces of hardware cloth into the front sides of the chicken tractor.
- Hammer the 21”x 26” piece of hardware cloth onto the front left panel of the chicken tractor. Make sure you’re mounting this on the left side of the front. That’s important because we’ll need that right side to serve as our door.
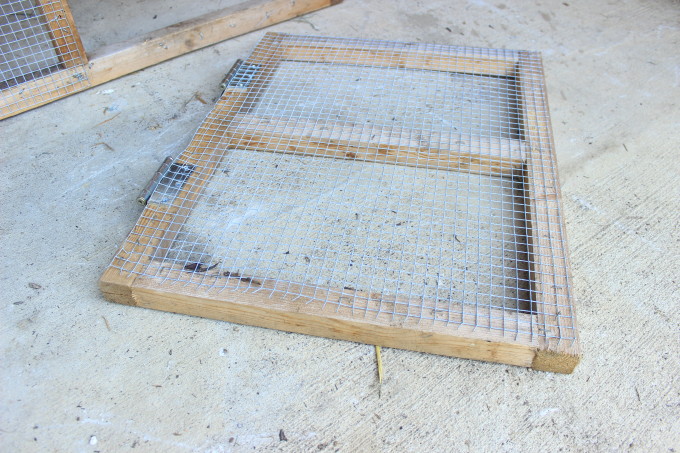
Constructing the Door
Building the Door
- First, lay out two 23” 2×2’s parallel with each other about 15” apart.
- Now, grab three 15” 2×2’s and screw two of them onto either end. Put the third one smack dab in the middle.
- Then, I like to attach the two 3½” hinges. I mounted one in the middle of the upper half, and the other in the middle of the lower half. Check out the photo below.
- Go ahead and attach the 22”x18” screen with poultry screen nails. I used staples, but have since transitioned to nails because they are stronger.
- Pat yourself on the back! You’re on your way to making this tractor very multi-functional.

Mounting the Door
I’ll save you a lot of hassle installing this door. Do you see that scrap 1×4 jammed in below the door? It’s holding the door in place until you attach it. You can use anything that’s ¾” thick.
Note: Notice that I didn’t set the door flush to either side. Mount the hinges so the little round part is out over either of the edges of the door post and door frame. Look at the photo below and notice how the hinge is in the middle of the crack.
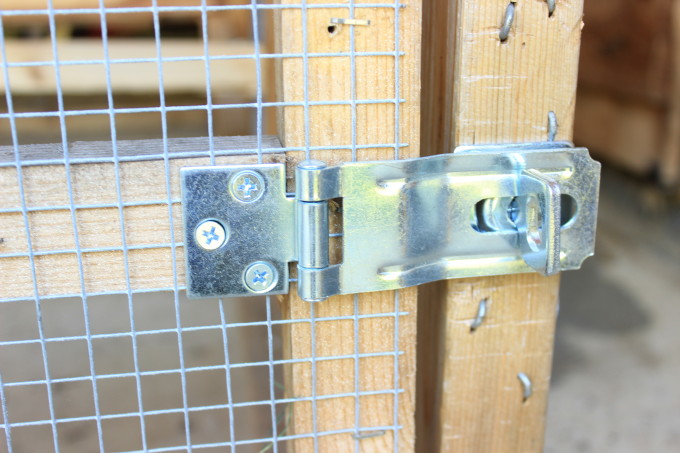
Install the Door Hasp
Screw in the 3½” door hasp as shown in the photo.

Install the Side Panels
- Go ahead and put your side panels on. By panels, I mean those used or new tins you’ve rounded up. Take the four 26” long pieces of tin and screw them into the back two quarters on either side. Be sure to use your tin screws with rubber washers.
- The back paneling is a little tricky, but we can do this! Let’s start with the bottom two panels. Start by placing the 13” tall piece of tin on the lower right side. Screw in a couple of screws into the right post and then the middle post.
- Now cut a 13” x 19” piece and make sure you still have one of those vertical ribs.
- Place that 13” x 19” piece on to the bottom left corner. Make sure you put the ribs together. The ribs won’t line up over a post, but they provide enough strength to be stable. Screw the corners, bottom, and top of the tin into your frame.
- Take the two 7½” x 14½” pieces and attach them to either side. Make sure you run ribs along the outer edges.
Pro-Tip: Notice how I have a bit of overhang over the bottom. That’s a good thing, as it helps keep the water runoff out of the coop.
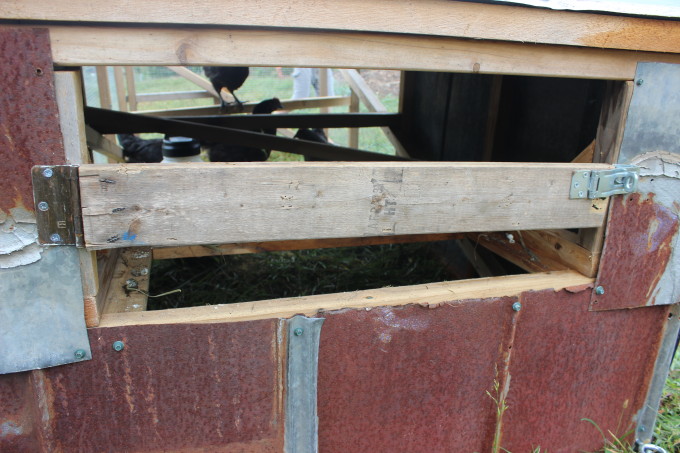
Install the Nesting Box Door
- Attach a 3½” hinge to the 26⅝” 1×4.
- Now, attach the hinged 1×4 to the left side. Notice how the round part doesn’t hang out over the edge, but just barely touches it. Also take note of the round part sitting so it is facing out. If done correctly, the 1×4 shouldn’t be touching the right side of the frame.
- You can now easily attach your 3½” hasp. I’d start by attaching the lock part first. Then place the hasp on that lock and then you can easily see exactly where to attach the hasp.
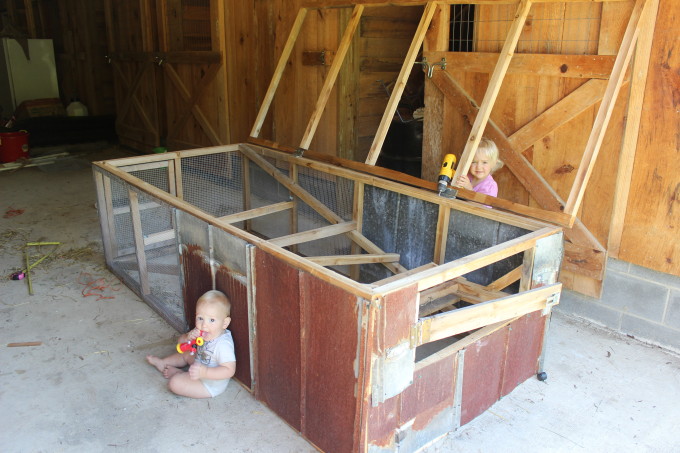
Building and Installing the Roofing Frame
- Lay out two 8’ 2×2’s about 40” apart.
- Now grab five 40” 2×2’s and attach them at the ends every 24”. Make sure you attach them on the center of the 24” on either side. I like to put two screws in on either side of each 40” piece to eliminate the risk of twisting.
- Get two 3½” hinges and attach them to your frame around the two foot marks from either end. This should be close to the 40” cross pieces. Look closely at the pic and you can see where I mounted my hinges.
Pro-Tip: Either stabilize the roofing frame against a wall while you attach it or grab a friend to help. First, place the roofing frame on the tractor frame, so you can adjust to get it perfectly on top with no overhangs or underhangs. Next, lift up the side without the hinges and screw in the side that does have hinges.
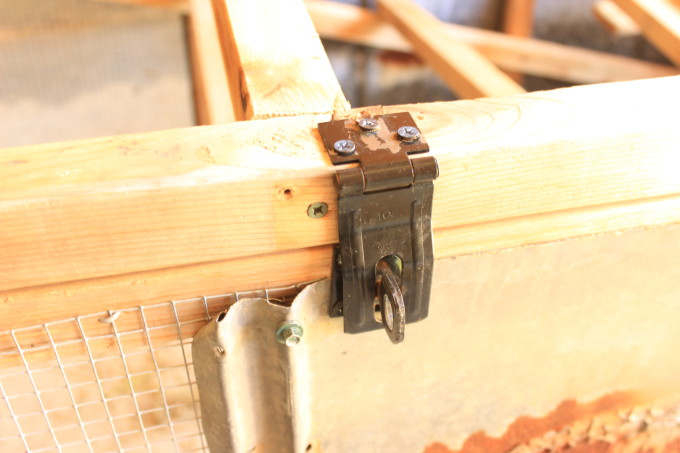
- Install the roof hasp before attaching the roof. It’s a lot easier to attach that way and looks much better too.
Pro-Tip: Notice how my hatch sits a little off-center. That’s to avoid having to mount the lock end of the hatch to the ridge of the tin. It’s not a big deal to be a little off-center, and it makes it so much easier just to attach it a little to the right or left of center.
- Take three 43½” pieces of tin and put them on the three open quadrants of your roof. They should lay over each other nicely. Attach them with roofing screws.
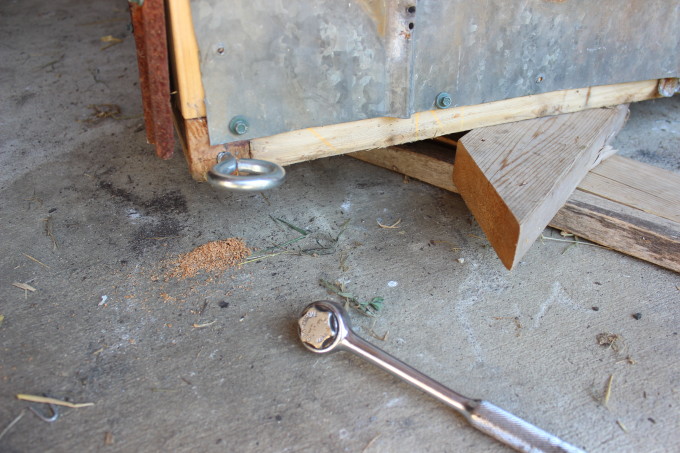
Attaching the Eye Hook Screws
- Prop up an end of the tractor for easier access to the bottom frame.
- Drill a ⅜” pilot hole on either side of the tractor to prep for the “O” ring.
- Now, screw in your eye hook screws, and then repeat these three steps on the other side.
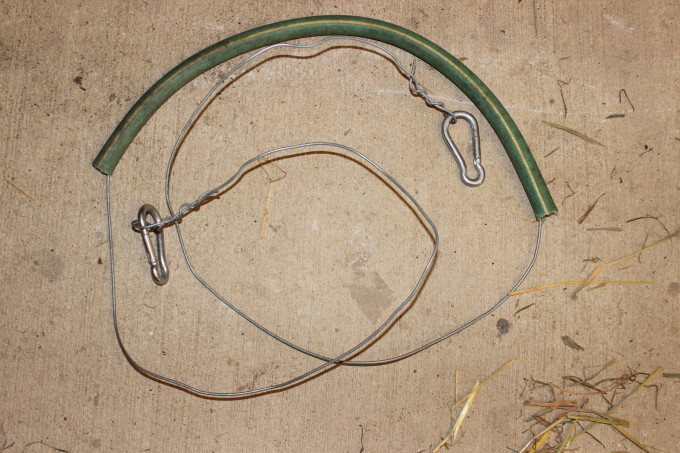
Designing the Handle to Pull the Chicken Tractor
- Get cord, wire, or rope and slip two feet of gardening hose into the middle of it.
- Next, make loops on either end. I used thick electric fence wire (12-14 gauge) and was able to twist some loops in the end somewhat easily.
- Twist or tie some loops on each end and attach your carabiners.
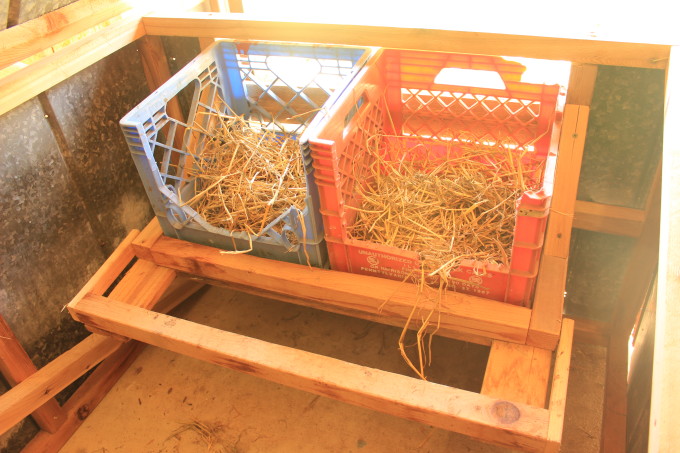
Build the Nesting Boxes
- Take the plastic milk crates and saw an opening in the front of each box. Keep an inch or two of wall space on the sides and 3 to 4 inches on the bottom walls. My boxes were super beat up, but I think you’ll get the point from the picture.
- Place the milk crate nesting boxes in the nesting platform, and you have a nesting area that cleans itself!
Preparing and Placing the PVC Runners for a Mobile Chicken Coop
I put on several feet of PVC runners as skids to help to move the tractor and to lift it up a bit to keep it off the ground. Some chicken tractor designers will have a coop plan that will attach a wheel to the frame to move the tractor, but I use PVC and raw determination and get the job done!
- Take two feet of 1½” PVC and saw it in half.
- Next, split each piece down the middle. I did this by putting it in a vice and sawing it through.
- Screw in the four runners with the round side facing out along all four corners. Make sure to mount them on the ends of your 8’ 2×2’s that are on the bottom of your tractor.
Pro-Tip: I flipped the chicken tractor on its side for access. Make sure to screw diagonally through the side of the runners. That way your screw heads aren’t sticking out the bottom and catching the ground. I used a 5/32” bit to drill a pilot hole for each screw, making it so much easier.
Tips for Using a Chicken Tractor
- Move Frequently – Moving every day is ideal unless your goal is tilling the dirt in a certain area.
- Add Carbon Material – If you’re having your chickens stay in one spot for a till job, adding carbon material such as hay, wood chips, or straw will go a long way to keep the place sanitary in addition to building the soil.
- Coop Tractors and Chicken Run – If you’re not tilling, then by all means, use the door for free ranging, or use it as a coop inside of an electric net fence.
Final Thoughts on DIY Chicken Tractor Plans
Build this chicken tractor, and you’ll be well on your way to a more fulfilling and sustainable lifestyle.
Backyard chickens are priceless assets to any yard or homestead, and this chicken tractor helps take advantage of their powerful characteristics.
Now, you can easily house a small flock in an easy and affordable way.